

Welcome back to the second part of my series, showcasing a real-time data processing pipeline!
In part 1, I explored visual real-time sensor data simulation, as the entry point into our pipeline.
Now it’s time to find out, how we can get the generated data into Apache ActiveMQ, by transferring it via the OSC protocol.
Apache ActiveMQ™ is the most popular open source, multi-protocol, Java-based messaging server. It supports a variety of Cross Language Clients and Protocols, and therefore makes it an excellent choice for our pipeline.
Get ActiveMQ up and running
I won’t focus on the installation and usage of ActiveMQ, as there is a lot of documentation out there already. Instead, I’ll just use docker to spin up a test instance. This will be sufficient, to verify the publishing process via OSC to ActiveMQ.
To pull and run ActiveMQ via docker, I used the following commands:
docker pull rmohr/activemq
docker run -d -p 61616:61616 -p 8161:8161 --name activemq rmohr/activemq
Please visit the related docker hub page to find out more about this image and the supported configuration options. I think you will find it quite useful.
As you probably guessed from the port assignments in the docker command above, ActiveMQ is listening on port 61616.
The admin web console can be reached via port 8161, and its default landing page looks like this:
Clicking on “Manage ActiveMQ broker” will ask you for the user id and password. The default is admin/admin.
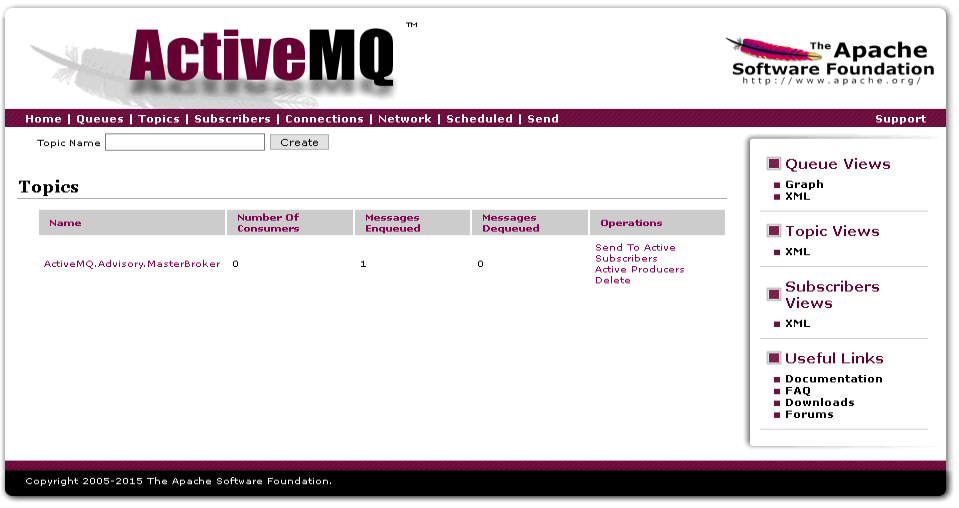
Once logged in, navigate to the “Topics” section, which should only show the entry for ActiveMQ.Advisory.MasterBroker initially.
Alright, ActiveMQ is running and waiting to be fed with messages.
Meet Osc2ActiveMQ
As you probably can imagine, there are a lot of different options to handle OSC messages forwarding into ActiveMQ.
Curious as I am, I wanted to check, if it was possible to do this using .NET Core. This would allow me to provide an application / docker image that would run on Windows and Linux.
It did not take very long to find out, that the ActiveMQ NMS library is available for .NET Core. Excellent!
Next, I needed a library that was able to deal with OSC messages. Browsing for viable options, I came across Paul Varcholik’s announcement of the recent update of his Bespoke.Osc library to a .NET Standard library. Luck me!
With the two main components available, I just needed to glue them together. For that, I took the example receiver code from Bespoke.Osc, added the Apache.NMS.ActiveMQ.Core NuGet package, fixed a calculation issue with the OscTimeTag, provided configuration options via environment variables (needed for docker), removed and added some other bits and pieces and ready I was.
The resulting docker images for osc2activemq are now available on docker hub as well. Along with the documentation about the different configuration options.
Time to figure out if, and how, it is working!
Starting osc2activemq
In order to make osc2activemq work, we at least need to specify the ActiveMQ broker URI. In my case, the IP of ActiveMQ was 192.168.10.159.
I therefore use the docker command below to start up an osc2activemq container.
docker run -d -p 5103:5103/udp --env BrokerUri="activemq:tcp://192.168.10.159:61616" --env Verbosity=4 --env OscAddressMode=data --name osc2activemq 3rdman/osc2activemq:latest
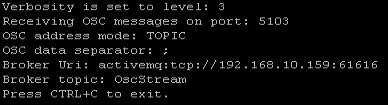
To get detailed information about the received and sent data, I am using verbosity level 4.
Monitoring the container logs shows, that it is indeed up and running.
docker logs -f osc2activemq
Preparing IanniX
The only thing left now, before we can transfer our first messages, is to configure IanniX so that it will use the correct IP and port to be able to talk to osc2activemq.
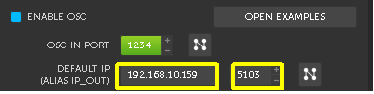
As you will see, this can be done in the Inspector window by navigating to Config > Network.
Enter the IP address of the docker host that osc2docker is running on in the “DEFAULT IP” field and also set the port that osc2docker is listening on (default 5103).
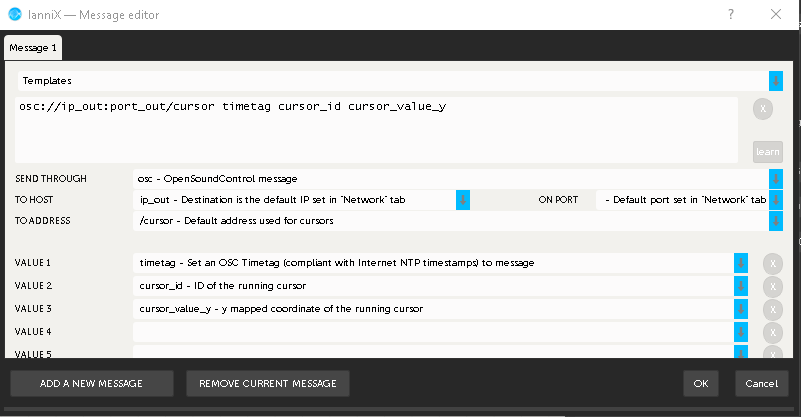
If you also want to transfer a timestamp, you would need to adjust the message template for the cursor as well.
In the example below, this is done be submitting the timetag as VALUE 1.
The result
Now let’s have a look at the result. In the video below I start IanniX and then bring in the terminal window with the osc2activemq log output.
Cool! We are getting message from IanniX and there also don’t seem to be any error messages while publishing to ActiveMQ. Let’s confirm by looking at ActiveMQ web console.
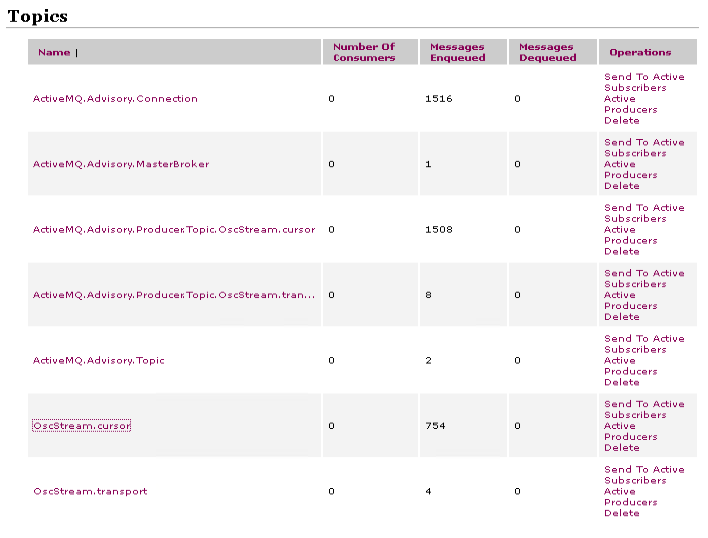
And yes, at the bottom of the Topics page we can now see our newly created topics with the related number of enqueued messages.
This means, that we have got this part of the pipeline working. Wonderful!
23. June 2019
[…] Part 2 – OSC 2 ActiveMQ […]
24. July 2019
[…] explained how to visually simulate sensor data and how to get it into ActiveMQ during the first two parts, it is now time to explore an initial setup that allows Apache Spark to […]
14. September 2019
[…] OSC to ActiveMQ […]